Master the Camel Stitch: Crochet a Beautiful Blanket Border

Are you looking to add a stunning, textured finish with a crochet blanket border that looks knitted? Look no further!
In this blog post, I’ll guide you through creating a gorgeous border that perfectly complements your Adventure Blanket CAL. This border uses the camel stitch, also known as the half double crochet in the third loop, a fun and easy stitch that adds a knitted-look texture to your project.
Designed to seamlessly integrate with the techniques used in your Adventure Blanket CAL’s divider section, this border not only enhances the overall aesthetic but also ties everything together beautifully. Whether you’re new to the camel stitch or need a refresher, our detailed right-handed and left-handed video tutorials will make this process simple and enjoyable.
Get ready to elevate your Adventure Blanket CAL with this eye-catching border!
The final section of the free Adventure Blanket CAL. This free blanket pattern event is a collaboration between myself and Kristine from Ambassador Crochet. But it has a twist, and you can play along even when the CAL has finished as the round up posts will always show the questions you need to answer in order to find out what your next section will be. Check out the roundup post for the other sections available and how this event worked.
Please note, this post may contain affiliate links – should you purchase anything using my affiliate link I may get a small commission at no extra cost to yourself!
Inspiration behind this crochet blanket border design
The inspiration behind the border design for the Adventure Blanket CAL came from the idea of creating a unified look that ties the whole project together. I used the same stitches from the divider sections to ensure a cohesive design. The camel stitch, or half double crochet in the third loop, was chosen for its ability to add a unique texture. I had been looking for a project to highlight this stitch, and the Adventure Blanket CAL was the perfect opportunity.


I often use the camel stitch in my designs, like my cup cozies and above my bottom up hat brims, because it adds a subtle texture that enhances the overall look.
For this border, I wanted to showcase the stitch more prominently. By incorporating it into the border, I aimed to create a striking, textured finish that complements the blanket and highlights the stitch’s versatility. The result is a border that brings the entire blanket together while showcasing the beauty of the camel stitch.
Construction of the design
The inspiration behind this border design for the Adventure Blanket CAL came from my love for the camel stitch, or half double crochet in the third loop. This stitch is incredibly easy to work once you identify that third loop, and it eliminates the hassle of worrying about stitch multiples, which can be a real challenge with blanket borders. I wanted to create a design that not only looked beautiful but was also straightforward to work up.
What makes this border particularly appealing is its flexibility. You can make it as wide as you like by simply repeating the rounds until you achieve the desired width. In my experience, the chunkier the border, the more stunning it looks.
This design not only ties the whole blanket together but also showcases the unique texture of the camel stitch, making it a standout feature of the Adventure Blanket CAL.
I have some designs that use this camel stitch in various combinations. Check out these free patterns on my blog posts:
The Yarn
For this section I used the Sirdar Country Classic Worsted in White.
I used 2 skeins for this section (approximately 600 yards).
This yarn has been so much fun to work with and looks absolutely beautiful. It is warm, a nice weight (not too heavy for me) and the colours are just stunning. You will definitely be seeing more of my designs in this yarn.
Get the PDF e-book!
You can purchase the ad-free PDF e-book for all 20 of the sections featured in the Adventure Blanket CAL by clicking the button below:
Included in the e-book are:
- all 20 sections featured in the free CAL
- 5 BONUS sections – giving you 25 sections in total and over 33,000 possible blanket combinations!
- Divider section instructions
- Border instructions
- a document with a list of all of the video links for each section should you need it (all videos will be included by 20th May 2024).
During the free crochet along the ebook will be $12.99 but the price will increase to $15.99 once the CAL ends on 10th June 2024!
This Camel Stitch Crochet Blanket Border Pattern specifics:
Materials:
| Any 4 weight yarn of your choosing – I used approximately 600 yards of Sirdar Country Classic worsted. (Actually you can use any weight yarn and a suitable sized hook based on your project, but as a blanket border most crocheters use 4 weight yarn) 5mm hook Scissors Tapestry Needle Stitch Markers optional to mark first or last stitch of the row. |
Gauge:
Not important for this project – a relaxed tension will work out just fine! You just have to be happy with how it looks.
You will want to make sure that your gauge is consistent with your previous sections for this blanket though!
Sizing:
You can make this one as wide as you prefer simply by repeating the rounds until you are happy with it.
Mine was approximately 1.5” wide when completed. To make it wider repeat row 2 until you are happy with it.
Abbreviations used:
Ch(s)–chain(s)
St(s)–stitch(es)
rep—repeat
sk – skip
Sc – single crochet
hdc – half double crochet
sp (s) – space (s)
*to* – repeat between the * and *
FO—fasten off
YO—yarn overSS – Slip stitch
Other notes:
| Written in US terms. Ch1 starts do not count as a st unless stated otherwise. Any ch sts within the row do count as sts. This border pattern is worked entirely with right sides facing you. Working evenly means you must decide how many stitches to place. If you use too many your work will pucker, too few and the sides of your blanket will pull. |
Video tutorials:
I have video tutorials to talk you through the whole border, and show you how to identify the third loop.
Special Stitches:
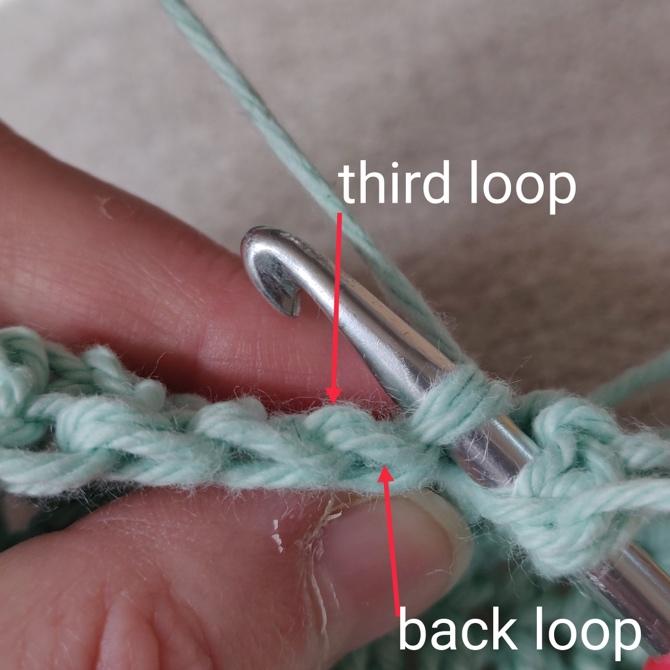
HDC third loop: also known as the camel stitch.
To work this stitch you will create a normal hdc stitch but you will be working into the third loop and not the front or back loops. The photo below shows you where the third loop will be.
The Pattern:
** This is a free pattern on the SunflowerCottageCrochet.com blog. If you are reading this anywhere else it is stolen content. Please do not copy and paste any part of it or print this pattern out. Please bookmark this page and use the website to work up your pattern. This helps my small business greatly as it provides a little bit of ad revenue which will in turn will allow me to continue to create free content for you!**
Round 1: Attach your border colour to the first st of the top of your blanket. Ch1, hdc in each st across until you have 1 st remaining, [hdc, ch2, hdc] in last st.
Turn your blanket so that you are working down the side. Hdc evenly down the side of your blanket until you have 1 st remaining, [hdc, ch2, hdc] in last st.
Turn your blanket so are working along the bottom of it. Hdc in each st across until you have 1 st remaining, [hdc, ch2, hdc] in last st.
Turn your blanket so that you are working up the final side. Hdc evenly down the side of your blanket until you have 1 st remaining, [hdc, ch2,] in last st. SS to join.
Round 2: CH1, *hdc third loop in each st across to the ch2 sp. [hdc, ch2, hdc] in ch2 sp*. Repeat from * to * around. Hdc third loop in final st (s). SS to join.
Rounds 3-5: Repeat round 2
Round 6: CH1, *sc third loop in each st across to the ch2 sp. [sc, ch2, sc] in ch2 sp*. Repeat from * to * around. Sc third loop in final st(s). SS to join.
Note: in this round we use sc so that the final round does not stand proud of the rest of the border!
FO and weave in ends.
Don’t forget to tag me on social media with your crochet blanket border posts! You can find me on FaceBook and Instagram

Hi! I’m Helen
I live on the north-east coast of England, UK. I am a mum and wife and enjoy reading and quilting. I started crocheting at 14 years old.
Sunflower Cottage Crochet is dedicated to empowering crocheters of all levels. I provide modern, easy-to-follow crochet patterns and video tutorials that make learning new techniques simple and accessible. My mission is to empower crocheters in their creativity, enabling them to confidently create beautiful projects no matter where they’re at in their journey. Whether it's a beginner seeking out the basics or an experienced enthusiast looking to level up their skills. My vision is for every user to experience the joy of mastering creative expression through crochet!