How to Crochet the Bobble Stitch (Step-by-Step with Photos & Tips!)

If you’ve ever wanted to add a pop of texture (or a playful polka-dot moment!) to your crochet projects, the bobble stitch is about to become your new best friend. This stitch is a crowd-pleaser—it’s dimensional, versatile, and surprisingly easy to learn.
You can use it to add dots of texture within your project, or create ‘pictures’ within your crochet. The latter is one of my favourite things to do with bobbles!
Whether you’re creating baby blankets, cozy hats, or quirky pillows, the bobble stitch brings that extra “ooh, what’s that?” magic that makes handmade items feel truly special.
Here are some of my bobble stitch patterns:


In this post, I’ll walk you through exactly how to crochet the bobble stitch step-by-step, with clear photos, easy-to-follow instructions, and some tips to avoid common pitfalls. Let’s get bobbling!
What is the Bobble Stitch in Crochet?
The bobble stitch is a textured crochet stitch that creates a raised, round bump on the surface of your fabric. It’s often confused with the puff stitch or the popcorn stitch, but here’s the scoop:
- Bobble Stitch: Worked all into the same stitch, using multiple partially completed double crochets, then closed together.
- Puff Stitch: Yarn overs and pull-ups, then pulled through all loops.
- Popcorn Stitch: Multiple completed stitches in one stitch, then joined together.
The bobble is dense, dramatic, and perfect for adding visual interest. You’ll usually work it on the wrong side of your fabric so it pops forward on the right side.
What You’ll Need
- Yarn – Any weight works, but I recommend a smooth #4 (Aran) yarn to practice with.
- Hook – Start with a 5mm hook.
- Scissors & Tapestry Needle – For weaving in those ends.
- Optional: Stitch markers, especially if you’re adding bobbles at regular intervals.
Abbreviations (US terms)
- ch – chain
- yo – yarn over
- dc – double crochet
- st – stitch
- [ ] – repeat section
How to Crochet the Bobble Stitch – Step-by-Step
For this tutorial, we’ll use a 5-dc bobble. You can make smaller or bigger bobbles by adjusting the number of partial dc stitches.
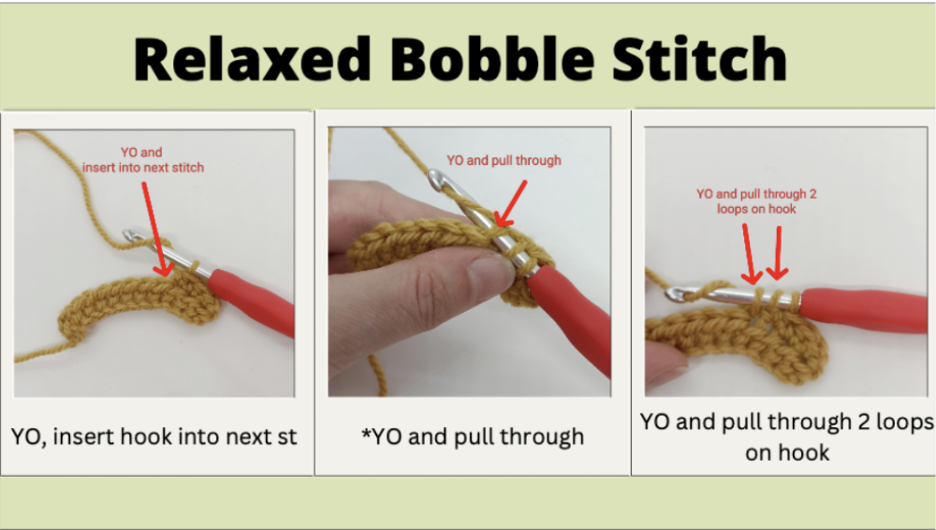
- Yarn over, insert hook into stitch, yarn over again and pull up a loop (3 loops on hook).
- Yarn over, pull through first 2 loops (2 loops remain).
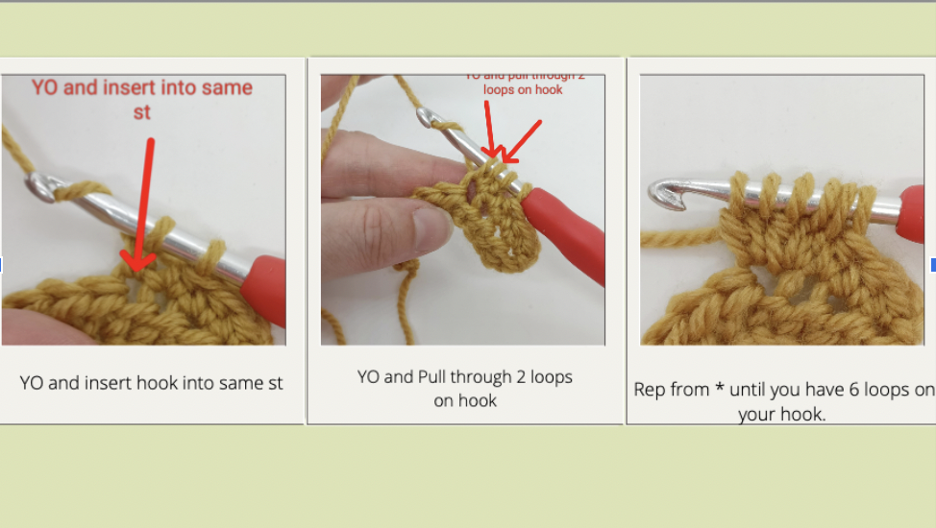
- Repeat steps 1–2 four more times in the same stitch. You should now have 6 loops on your hook.
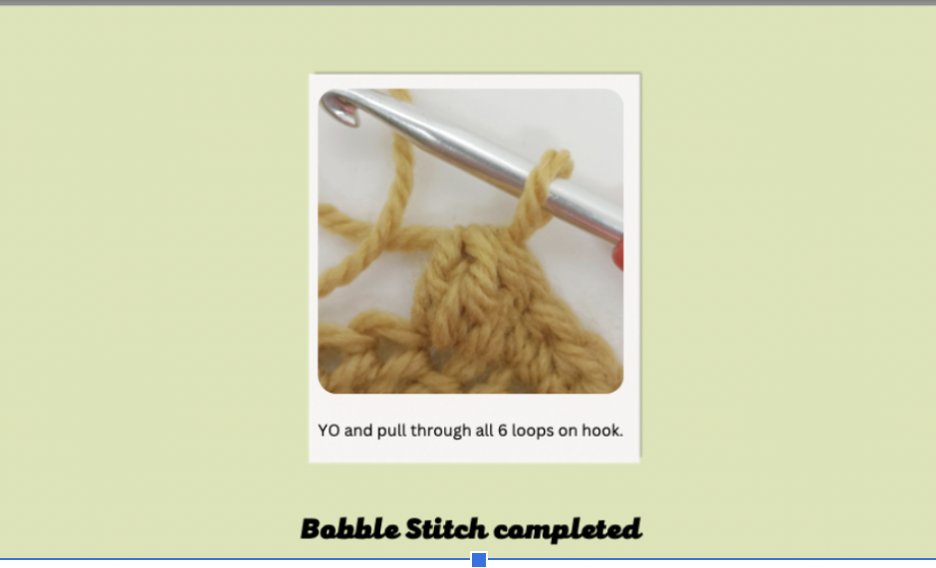
- Yarn over and pull through all 6 loops.
- Ch 1 to close the bobble if your pattern calls for it (some patterns include this, others don’t).
Your bobble should now be puffed up like a tiny balloon!
Visual Tutorial
Video Tutorials:


Tips for Changing Colour on your bobbles!
Changing colour for your bobble stitches can really help to elevate your crochet project. It can also be a great way of using your scraps and part used skeins. Check out my free Funky Bobbles Scarf for an example of this.

But changing colour can take a few minutes of practice (although it is not as difficult as you may think!)
I do have some video tutorials that will help you to master the art of colour changing for any crochet project. The theory is exactly the same regardless of the stitch or technique you are using.


Tips for Perfect Bobbles
- Tension is key. Too tight and you’ll struggle to close the bobble. Too loose and it won’t pop!
- Work on the wrong side to have the bobble puff on the right side.
- Use a contrasting yarn for practice so you can see each loop clearly.
- Give it a little pinch after it’s made to help it pop forward.
Try These Easy Bobble Stitch Projects
Want to test out your new bobble skills? Try these:
- Bobble stitch washcloth – great for practicing tension!
- Add bobble rows to a basic blanket. I have used my bobble blanket strip to create a border on my penguin blanket which was just perfect.
- Use bobbles to shape hearts, letters, or fun motifs.
- Bobble stitch some scarves for winter. I have my adult women’s funky bobbles scarf and also a child’s version for you to pick from. Both are free patterns on my blog post.
Common Mistakes and Fixes when Working the Bobble Stitch
- Bobbles not popping? You may be working on the wrong side.
- Flat bobbles? Check your yarn weight and hook size are correct and then check your tension.
- Lopsided bobbles? Make sure you’re inserting your hook into the same stitch each time.
Final Thoughts
You don’t have to be a crochet wizard to add this magical texture to your work. Like anything in crochet, it’s all about practice—and a bit of yarn-fueled determination. Try it out, tag me in your creations, and let the bobble obsession begin!
Got questions? Leave a comment below or drop me a DM on Instagram. I’m always happy to help troubleshoot your bobbles. 😉
Happy crocheting!
Helen x

Hi! I’m Helen
I live on the north-east coast of England, UK. I am a mum and wife and enjoy reading and quilting. I started crocheting at 14 years old.
Sunflower Cottage Crochet is dedicated to empowering crocheters of all levels. I provide modern, easy-to-follow crochet patterns and video tutorials that make learning new techniques simple and accessible. My mission is to empower crocheters in their creativity, enabling them to confidently create beautiful projects no matter where they’re at in their journey. Whether it's a beginner seeking out the basics or an experienced enthusiast looking to level up their skills. My vision is for every user to experience the joy of mastering creative expression through crochet!